March 28, 2012

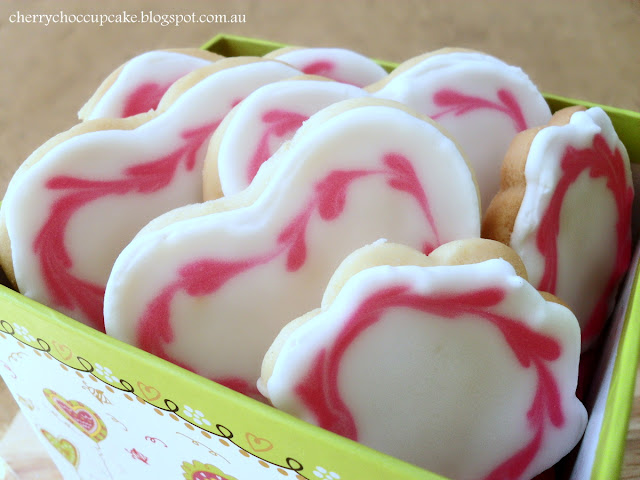
Swirl of Hearts Cookies


I love, love cookies. Especially the ones that are decorated so beautifully that they look like the most cutest and prettiest things ever. I have been putting this idea off since I added it to my bake-to-do list but after browsing many cookie creations created by other great bakers, I finally decided it was the time to try these. In fact, this is the first time I've attempted to make sugar cookies and decorate them with royal icing. In the end, I was really happy of the results and although it took me about 2 or 3 hours to bake and ice a huge batch of cookies, it was well worth all the time and effort.


What I actually mean by saying that it was worth it, is that these sweet cookies are seriously addictive and really yummy. The soft, buttery and slighly crumbly texture of the cookies melt in your mouth when you take the first bite and the sweet, hard icing matches perfectly with the soft cookie. Now I am kind of obsessed with them and am already thinking about how to decorate the next batch of cookies.... so do you think animal or nature themed cookies are good ideas? After eating the first cookie, I couldn't stop at one!


I decided to start off with a nice, simple pattern that looks like a swirl of connected hearts. You might have seen this technique before but just in case you are curious, all you need is a toothpick and a small batch of royal icing tinted to your desired colour. Then just pipe small dots of the coloured icing around the edge of a wet flooded cookie and drag your toothpick around the dots to create the pattern. So easy and fun to do which was perfect for me as a beginner.


Sugarbelle, who you might know as the cookie queen, makes amazing cookies and has a blog dedicated to her huge cookie love. Her sugar cookie recipe that I found looked perfect for my first batch of cookies and thats when I went with her recipe, which also has helpful tips and hints as well as loads of pictures.

Perfect sugar cookies from Sugarbelle
Makes two to two and a half dozen medium sized cookies.


Ingredients:

227 grams unsalted butter, softened at room temperature
175 grams confectioner’s or icing sugar
1 egg at room temperature
2 teaspoons vanilla extract
1 teaspoon salt
2 teaspoons baking powder
400-425 grams all-purpose or plain flour

Method:

1. Cream together butter and sugar until light and fluffy. Add the egg and vanilla and mix well.

2. In a medium bowl, sift together flour, baking powder, and salt. Slowly add this to the wet mixture a little at a time until it is incorporated and forms a dough.

3. Immediately roll out the dough to a 1/4 of an inch and dust it with flour if it becomes sticky to handle. Cut cookies into desired shapes with assorted cookie cutters.

4. Carefully transfer the cut out shapes to a parchment or baking paper lined baking tray. Bake cookies in a preheated oven of 204 degrees celcius or 400 degrees farenheit for about 7-8 minutes until the cookies look dry and lighly golden but not brown. Let them completely cool on a wired rack before decorating them with royal icing.

Royal icing from Joy of Baking
Makes a small batch, enough for the cookies I made from the recipe above.


Ingredients:

For using it as a border:
1 large egg white
1 teaspoon fresh lemon juice
2 cups (230 grams) icing or confectioner's sugar, sifted

For using it for flooding cookies:
2 large egg whites
2 teaspoons fresh lemon juice
3 cups (330 grams) icing or confectioner's sugar, sifted

Method:

1. Beat the egg white with the lemon juice and icing sugar together with a stand mixer until it turns into a stiff icing like a meringue and looks like of piping consistency. Cover the icing with plastic wrap tightly when not in use.

2. Put the icing in a piping bag fitted with a small round tip (like no.2) and pipe a border around the outside edges of the cookie. Let it completely dry before flooding or covering the surface of the  cookie with more royal icing.

3. For the icing for flooding the cookies; in a bowl of a stand mixer, beat the egg whites and lemon juice until combined.

4. Add the icing sugar to the mixture and beat on low speed until smooth and incorporated. The icing should form a ribbon when you lift the beater and fall back into the icing before slowly disappearing. If it is too thin, add more icing sugar to thicken it to the right consistency or if it is too thick, add a little water until smooth. Cover the icing with plastic wrap when not using to prevent it from drying out.

5. Tint this batch of icing to your desired colour with food gel colouring or just keep it plain white. Cover the cookies' surface that have been bordered earlier with royal icing and move it with a small spoon to the edges to cover the cookie completely.

6. Decorate as desired when the icing is still wet (for me, I used the hearts technique). Let them sit overnight to completely dry.


March 18, 2012

Multi-coloured Rainbow Cake


Okay, so this might look like an ugly, huge, or whatever you can call it cake covered with swiss meringue buttercream and some sprinkles on top. I know, I am quite embarrased to show you my  poor cake-making skills especially in smoothing out frosting, since I haven't had enough time to practice. The first EVER layer cake I made was a chocolate cake with cream cheese frosting and it was a huge disaster when I assembled them. As I was rushing and being impatient at the same time, I didn't bother to wait for the cakes to cool down and started slathering the icing on top. Big mistake! The warm cake layers melted the icing and started sliding off each other and cracking into two. It looked like a huge blob of chocolate cake at the end and my friends backed off a bit, but luckily it tasted delicious! Well, there's a little of my unfortunate baking history there.


The frosting on the cake here isn't completely white because of the pesky crumbs that made their way into the icing. I was a bit sloppy and wasn't really worried about getting cake crumbs in the frosting. Next time I really have to be more careful. I've learnt so much techniques through the internet and have come to realise how time consuming layer cakes can be. It takes me hours to make a layer cake which is pretty much why I don't make them so often. But I am going to spare more time to dedicate it for baking cakes. I also bake layer by layer and this makes it a little more difficult because you would have to weigh each of the divided batter so they would be equal when baked. Then you will have to wait for them to completely cool down before assembling them.


Here I equally divided the batter and added some food gel colouring to each. Actually, I only had 4 colours so I mixed green and blue for a kind of turquoise colour and pink and purple to make lavender. I think the colours turned out well when baked except the blue colour. It turned GREEN. I have no idea why when I bake blue tinted cakes they seem to turn green when baked. But I suspect it might have something to do with baking powder/soda. Does anyone know what happened? Anyway, I'll show you what it looks inside the cake...


Tada! Not bad for the second attempt. Can you see that the top layer above the lavender was supposed to be blue when it turned out green? My first attempt at a rainbow cake was bad, really bad. It was too sweet, too buttery, too ugly...I don't want to give you any more details about it, thank you very much. I was quite surprised to see the layers there when I carefully cut the first piece. All my friends were so impressed with the colours. Even one said that it was too pretty to eat! The layers are a little slanted though, which makes the cake domed, but that really didn't matter because it tasted so fluffy and delicious.


I got the idea from the most popular and best design of  modern cake history: Whisk Kid's Super Epic Rainbow Cake. If you've never seen or even heard of the rainbow cake, well, you must have been hiding in a hole. It is everywhere on the internet. Search on google and you'll have so many results of rainbow cakes. I've seen so many bakers try it out and that was to the point that I had to make my own.


The recipe states that you would need to use 9 egg whites and 452 grams of butter for the frosting, which I decided was waaaay too much. I wasn't prepared to use and eat 9 eggs and 4 sticks of butter! So I just stuck with 5 egg whites to frost and thinly spread it between the layers. 226 grams of butter is enough fat for me. I also added some strawberry jam to each layer and that gave it a beautiful flavour and moistness to the cake. You can use any jam you like; apricot, raspberry, grape...


Adapted from Whisk Kid's Super Epic Rainbow Cake.

Multi-coloured Rainbow Cake

Ingredients for white cake:
226 grams (2 sticks) butter, room temperature
2 cups (400 g) sugar
5 egg whites, room temperature
2 teaspoons of vanilla
3 cups (426 g) flour
4 tsp of baking powder
½ tsp of salt
1 1/2 cups (355 ml) milk, warmed for 30 sec in microwave to bring to room temperature
6 different food gel colours

Method:

1. Preheat the oven to 177 degrees C or 350 degrees F. Grease and line cake pans with baking paper (I had two 8 inch pans).

2. In a medium bowl, sift the flour, baking powder and salt together. Separate the eggs and keep the egg whites all in one bowl and set aside.

3. Cream the sugar and butter in an electic mixer until light and fluffy, then slowly add the egg whites a little at a time and the vanilla until fully incorporated. Mix in the flour mixture and milk alternating between each in 2 parts so it forms a smooth, white cake batter.

4. Divide the batter into six bowls which is about 1 cup each OR weigh the batter by weighing the empty mixing bowl and then subtract the weight of the bowl from the final weight of the batter in it. Divide the number by six and add that weight of batter to each bowl to ensure equal layers. Add your desired food gel colours to each bowl until it is the shade you want.

5. Pour the batter in the prepared pans and bake in preheated oven for about 15 minutes each until the skewer inserted comes out clean. Let them cool in the pan for 10 minutes before removing them and allowing them to rest and cool completely on a wired rack or put them in the fridge to speed up the cooling process. You wouldn't want to work with warm or unsettled cake layers!

Swiss Meringue Buttercream to frost, thinly fill and crumb coat

Ingredients:
5 egg whites
1 cup (200 grams) of sugar
226 grams (2 sticks) of butter, chopped into small pieces and at room temperature
1 tsp of vanilla extract

Method:

1. Cook the egg whites and sugar in a double boiler (or a heatproof bowl over a small simmering saucepan of water) and whisk constantly over medium heat until fully dissolved. The mixture should be hot and when you rub it between your fingers, it is smooth with no grains of sugar.

2. Pour into another bowl and whip the mixture with an electric mixer on high speed until it comes to room temperature and it turns to stiff peaks. Slowly add the pieces of butter while whisking on medium speed one after the other when one piece is fully incorporated. When the all the butter is added, whisk on a high speed until it is smooth and has come together nicely for about 5 minutes. If it is soupy, put it in the fridge for 10 mins and whisk again. If it becomes curdled, just keep whisking and it will eventually turn into a silky smooth buttercream.

3. Add the vanilla and beat until smooth. Use it straight away.

Assembly:

1. Stack the cakes in your preferred order and add a thin layer of jam to each, followed by a small amount of the buttercream. Keep filling and stacking until you reach the top, crumb coat with a thin layer of frosting on the top and sides to seal in the crumbs and refridgerate for about 15 minutes.

2. Frost the cake with the remaining buttercream and smooth it out with an offset spatula running under hot water. Add sprinkles on top of the cake if you like or sprinkle it with any other topping.

3. Put it in the fridge to rest overnight and bring it to room temperature when it is ready to serve. This will soften the frosting as it is hard and buttery when cold.


March 9, 2012

Sweet Candy Vanilla Cupcakes


Vanilla is one of my favourite flavours. It basically goes with everything and anything sweet like cakes or cupcakes which heightens the flavours and gives it a beautiful vanilla-y taste. Vanilla cupcakes are no exception. But when it comes to eating but not making cakes, I actually prefer chocolate over vanilla most of the time because I admit that I am a devoted chocoholic. Sorry vanilla cake fans! I haven't found the perfect vanilla cupcake recipe yet, but this one has a moist and light crumb and it smells delicious too. They tasted really good just like a good vanilla cupcake should and are like the ones at the local bakery especially with the cute candies on top.


I decided to use Sweetapolita's recipe of Bakery-style cupcakes with vanilla frosting as I wanted to try out different recipes in the search for the best vanilla cupcake. I loved the texture of it and the sweetness of the frosting helped balance out the flavours of the cupcake. I also topped them with some of the candies I had leftover from the Homemade Candy Hearts and Stars to add a touch of cuteness to the plain cupcakes. As you can see, I am gradually getting better at piping swirls on cupcakes, but thats after scraping ugly swirls about 100 times before re-piping them again. That also made the cupcake liners look untidy and soon enough, the icing started to melt. I had to put the icing in and out of the fridge since it was a reasonably hot day before I was happy enough *sigh*. I really want to own the 1M piping tip that everyone's talking about as the best tip for a cupcake swirl. Do you agree that it is the BEST one?


Anyway, back to the cupcakes. I used assorted piping tips here and thought the one with the pink candies looks the best; just like a little pink ribbon wrapped around the top which makes it look so elegant and pretty. You may also notice that I have a thing for cupcakes as there are a few of them here in this blog. That's because they're so cute and small, perfect for kids and treats that are already portioned for you. They are also so fun to make and decorate without spending too much time on them. And is there anyone out there who doesn't love cupcakes? But don't get me wrong, I love baking cakes and everything about them but I don't make them too often due to my studies and time constraints. Can't wait till the holidays though!


Take your time and be creative in decorating the cupcakes. You can  match them according to the event or day you are making them. You can also colour the frosting to the desired shade whether its bright and colourful or pale and pastel and add any candy or topping you can think of! Like sprinkles, lollies, homemade candies or chocolates. These cupcakes I made here are very girly and pretty that are great for any event including girls' birthdays, parties or a simple get together. My best friend's little sister was very happy when I gave her the cupcake and about 10 seconds later, she demolished it and even asked me for another one! She loved eating the frosting and candies the most and pink is her favourite colour anyway. I don't know why I seem to have great happiness when people enjoy my food and baked goods....


Adapted from Sweetapolita's Bakery-Style Vanilla Cupcakes        

Sweet Candy Vanilla Cupcakes

Source: Magnolia’s Vanilla Cupcakes from Food Network
Makes about 12 cupcakes (double the recipe if you want 24 cupcakes)

Ingredients
3/4 cups (95 grams) of self-raising flour
5/8 cups (80 grams) of plain or all-purpose flour
1/2 cup (1 stick/113.5 grams) unsalted butter, softened
1 cup (200 grams) white sugar
2 large eggs, at room temperature
1/2 cup (125 mL) milk
1/2 teaspoon vanilla extract or 1 tsp for a stronger flavour

Sweet Vanilla Frosting

Ingredients
170 grams (1.5 sticks) unsalted butter, softened and cut into cubes
313 grams (2.5 cups)  icing, powdered or confectioners sugar
1 tablespoon (15 mL) milk
1 teaspoon (5 mL) vanilla extract
a pinch of salt

Method

1. Preheat the oven to 177 degrees C or 350 degrees F. Line a muffin tin with 12 or more cupcake liners of your choice.

2. Using two bowls, combine the flours in one and the milk and vanilla in the other and set it aside.

3. In the bowl of an electric mixer, cream the butter on medium speed until smooth. Gradually add the sugar and beat until light and fluffy. Add the eggs, 1 at a time, beating well after each addition.

4. Add the dry ingredients in 3 parts, alternating with the wet (milk and vanilla). With each addition, beat until the ingredients are incorporated but try not to over beat. Scrape down the batter of the sides in the bowl with a rubber spatula to make sure the ingredients are well blended.

5. Spoon the batter into the cupcake liners with care and bake in the middle of oven until the tops of the cupcakes turn golden brown and a toothpick inserted into the center comes out nearly clean, for about 18 minutes.

6. Cool the cupcakes in tin for 15 minutes. Remove from the tin and cool completely on a wire rack before decorating.

7. When the cupcakes are ready to be decorated, make the icing in the bowl of an electric mixer and whip the butter for 5 minutes on medium speed until very pale & creamy.

8. Add the remaining ingredients and mix on low speed for 1 minute, then on medium speed for 5 minutes. The frosting should be very light, creamy, fluffy (and tasty!).

9. Add a little gel food colouring (I used electric pink) and mix until blended.

10. Best used straight away to pipe swirls or ice them as you like and top with sweet candies.


March 3, 2012

Homemade Candy Hearts and Stars


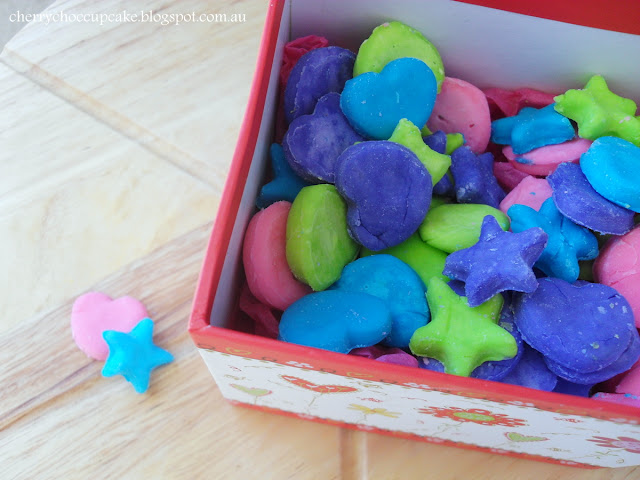
Sometimes I feel like baking cakes. Sometimes cupcakes, or cookies! But that Friday morning was different; I was too lazy to bake up a storm and I wanted to make something that was easy yet fun to do. So while being in my "lazy bake mode", I browsed through recipes on the web only to find something really cute but simple: Multilingual Conversation hearts by Susan from Diamonds for Dessert. I can admit that I fell in love with those little hearts as soon as I set my eyes on them. They looked really attractive and bright and colourful especially with all the languages stamped on them saying "I love you". It was such a smart idea and Susan is really talented in creating sweet things. You should go check out her amazing blog!


I blame myself for rushing in the cutting out process because they are not as perfect and neat as I expected. But at least they're cute and colourful, right?  I also decided to leave out the messages on them so they would be just homemade candy hearts and stars. No complicated languages or stamps or liquid food colouring. I didn't have enough time for those things anyway so I just kept them plain and simple. Making stars as well seemed to be a great idea since I had little star cookie cutters laying around, but feel free to use any small cookie cutter you have.


These little candies are actually quite easy to make using mainly powdered sugar or icing sugar and gelatin without the need of any fancy ingredients. It was almost like working with fondant though but it does become dry pretty quickly when exposed to the air. Rolling it out, it brang back memories of me playing with play dough as a kid; moulding it into different shapes and showing off my creations to my mum. It was nice to think about it and it made me even more excited because the best part is that these pretty treats are edible!


There is one important thing you need to have when making these, that is... patience, yes, lots of it because you need to let them dry out for a few hours before they are ready to eat. That is, unless you like eating raw candy, but trust me, they taste better when they're hard in texture. I did however, put them in the oven at the lowest temperature possible for a few minutes to make the drying process faster. But that also depends on how thick the candies are. Mine were a little more thin than those from Diamonds for Desserts so they dried quicker. That's up to you to decide on whether you like your candies thick or thin.

For this fun project, you can divide the dough equally by weighing them on a kitchen scale and add any food colouring you like as well as flavour extracts. I only had vanilla though so I used that for all of them. They definitely tasted candy-like and was sweet and delicious! Perfect for packaging them in pretty boxes to give to someone special as little edible gifts.


Slightly adapted from Multilingual Conversion Hearts by Diamonds for Dessert

Conversation Hearts adapted from about.com
Makes about 180 candies

1 tsp unflavored gelatin
1/4 cup water
1 tsp light corn syrup (I used honey instead)
1 lb (454 grams) powdered sugar, plus extra for dusting
1/4 to 1 tsp assorted flavoring extracts
assorted food colorings
heart-shaped or other small cookie cutters

Method:

1. Combine the gelatin, water, and corn syrup or honey in a small bowl and mix. Put it in a microwave oven for 15-20 seconds, or until the gelatin dissolves and mix again. Pour this mixture into a bowl of a stand mixer (Or if using a hand mixer, pour into a large bowl). Add 1 cup of the powdered sugar to the bowl and mix on low until the sugar is combined. You can also alternatively use a spatula or whisk in place of the mixer.

2. Add the remaining powdered sugar 1 cup at a time, mixing until all the sugar is combined and this is where you should end up with a stiff dough. Dust the bench surface with the extra powdered sugar and put the candy dough out onto the surface. Knead the dough on the surface until no longer sticky.

3. Divide the dough into six pieces. Add the color and flavoring extract of your choice to each piece, kneading it until the color is well mixed and the dough is no longer sticky. If it is still sticky, knead in more powdered sugar until smooth. When you aren't using a piece of dough, make sure you keep it covered in plastic wrap so it doesn't dry out.

4. Once done coloring and flavoring, roll the dough out to between 1/8 inch and 1/4 inch thick. Use your cookie cutter to cut out shapes, theb place them on a parchment paper lined baking tray. Roll up the scraps and cut out more candies. Then repeat with the rest of the dough.

5. Let the candies dry for at least 24 hours. To test if its done, bite into a candy. If it's still wet in the center, let it dry longer. To dry them faster, preheat your oven to the lowest temperature possible. Once preheated, turn the oven off and place the sheets of candies in the oven with the door closed for about 10-15 minutes. Remove and let them totally cool.


February 24, 2012

Chewy Chocolate Caramel Slice


This slice is seriously naughty. And yummy. Imagine a crunchy biscuit base, followed by a chewy caramel and sweet chocolate...mmmm just delicious. I actually couldn't believe myself that I have never made or even TRIED a chocolate caramel slice before. That's until I finally did when I had some guests coming over and as usual, I searched taste.com.au for sweet recipes that I could try making. Then I found this chocolate caramel slice and realised that from the rave reviews, I literally had to make it right away without delay. So for the taste test, I let my mother have some but surprisingly she didn't really like it though because it was too sweet and too "fattening". But I loved it and even the friends I shared them with devoured over it.

For this recipe, I decided to leave out the desiccated coconut in the biscuit base and put milk chocolate for the topping instead of dark because I though that it would overpower the rest of the slice. As long as you follow the instructions to a tee, you're likely not to have any problems, such as the caramel not setting. It's not that hard to make, but it does require some time and some patience to make each of the layers separately. I admit that the caramel filling was probably the most hardest out of all of the layers since I don't make them regularly. It was quite a boring process for me because I had to stand there and keep stirring the caramel for about 10 mins until it finally thickened up. And you can't boil it to make it cook faster either. But it doesn't give you burns like the traditional caramels though because its made out of condensed milk.


You could use any square or rectangular tin you like, but if you want thicker layers like mine, use a small rectangular tin. The bigger the tin, the thinner the layers. It's up to you to choose but personally, I kinda liked the proportions of the layers as it is like a bar instead of a slice. Maybe I should try a bigger tin next time...


Its okay if you're eating small pieces at time (it reminds me of chocolate bars) but eating huge pieces can make you feel...too...sugary. So, for all the sweet tooths out there, this slice is a great treat for a quick sugar fix but not so great for health fanatics!


Chewy Chocolate Caramel Slice adapted from the taste website

Ingredients

Biscuit base
190g (1 1/4 cups) self-raising flour
70g (1/3 cup) brown sugar
120g butter, melted

Caramel filling
1 x 395g can sweetened condensed milk
70g (1/3 cup) brown sugar
60g butter

Chocolate topping
200 g milk chocolate, chopped or broken into pieces
Half of 1/3 cup or 1/6 cup thickened cream

Method

1. Preheat the oven to 180°C. Brush a 13 x 30cm loaf pan or any square or rectangular tin with melted butter to lightly grease. Line the base with baking paper, allowing the sides to overhang.

2. To make the biscuit base, combine the flour and sugar in a bowl. Add the melted butter and stir until just combined. Spoon the mixture into the prepared pan and press firmly over the base. Bake in preheated oven for 20 minutes or until golden. Remove from oven.

3. *Meanwhile, make the caramel filling by combining the condensed milk, sugar and butter in a medium saucepan over a low heat. Cook, stirring constantly with a wooden spoon, for 8 minutes or more until caramel thickens but try not to boil the mixture.

4. Pour the hot caramel over the biscuit base. Bake in the oven for 15 minutes or until caramel begins to bubble and has formed a skin on the surface. Remove from oven and set aside for about 1 hour to cool down slightly.

5. To make the chocolate topping, place the chocolate and cream in a double boiler (put a heatproof bowl on top of a fitting saucepan with water) over low heat and stir with a metal spoon for 3 to 4 minutes until the chocolate melts and mixture is smooth. Pour the chocolate mixture evenly over the caramel and use a spatula or knife to smooth the surface. Place in the fridge for 1 to 2 hours until  it is set and cut into pieces to serve.

*Notes: It's very important that you keep stirring the caramel over a low heat with patience until it slowly oozes of the spoon and has a thick consistensy with a caramel colour. This may take more than 8 minutes. Otherwise it will not set and ruin the whole slice which will become just like a caramel sauce.


February 19, 2012

Strawberry Swirl Ice Cream Slice


One word for this dish, DELICIOUS! Flicking through my collection of cookbooks (I only have 3 though), I found a recipe that instantly caught my attention and I wanted to create it straight away. The name is the Strawberry Swirl Ice Cream Slice. Slices of vanilla ice cream with strawberry cream swirled together to create a wonderful combination. Strawberries and cream really go well together. Originally, the recipe had raspberries in it and it required bought vanilla ice cream. But I changed it a little by swapping the main hero of the ice cream, the raspberries for the strawberries as well as making my Easy Peasy Ice Cream recipe that I use most of the time. You can tell by now how much I love this recipe. It is super easy and makes creamy ice cream without the hard effort.

Now, back to the ice cream. Photographing this was quite tricky as the ice cream started to melt (it was a little hot that day) really quickly. I had to put it back in the freezer again to take photos when some of it melted in a puddle. But the melted ice cream actually tasted like a good milkshake though. So make sure you store it in the freezer like any other ice cream and serve it right away. This specific recipe would need to be frozen overnight before serving (its worth the wait) and it is yummy on its own or with fresh strawberries and pouring cream. You can also have as many slices as you want but I suggest 2 slices would be good.

Strawberry Swirl Ice Cream Slice

Ingredients

250g (9oz) strawberries*
1 litre (35 fl oz/4 cups) good-quality vanilla ice cream*
250 ml (9 fl oz/1 cup) thickened cream
Extra strawberries and cream to serve (optional)

Method

1. Line the base and sides of a 1.75 litre loaf tin with plastic wrap or foil.

2. Puree the strawberries in a food processor or blender until smooth. Meanwhile, transfer the ice cream from the freezer to the fridge to allow to soften.

Ruby red strawberries
3. Whisk the cream until soft peaks form and fold the strawberry puree into the cream until combined and pink in colour.

Strawberry cream
4. Pour the mixture into a metal freezer tray and cover it with plastic wrap* before putting it into the freezer to cool. Stir occasionally until thick and remove from the freezer after half frozen and beat well.

5. Spoon blobs of softened vanilla ice cream over the base of the prepared loaf tin. Spoon the strawberry mixture between the ice cream blobs. Then use a sharp knife or skewer to swirl the two mixtures together while being careful to not dig into the plastic or foil. Cover the tin tightly with plastic wrap.

6. Freeze for 2 hours or until half frozen and smooth the top of the ice cream. Freeze overnight until set. Serve straight away as scoops or slices with extra strawberries and cream.

*Notes: You can use more strawberries if you want to give it a stronger flavour and colour or use any other berry like raspberries. You could also make your own homemade ice cream using your favourite recipe for the vanilla ice cream. The plastic wrap prevents the ice cream from having ice crystals in it which can ruin the texture of the ice cream. I'm sure everyone likes creamy but not icy ice cream.


February 15, 2012

Double-Decker Ice Cream Cake


I have been waiting a while to find the perfect occasion to make an ice cream cake. Since I've seen them on other blogs, I dreamed of having layers of my favourite ice cream flavours in the form of a massive cake. And then the time came when my friends came over. This was the result: beautiful layers of vanilla and chocolate ice cream with a chocolate biscuit base and brownie. Did I also mention a milk chocolate ganache and white chocolate shavings!? That seems to be a mouthful of words and A LOT of calories but it tasted heavenly. It was really heavy to carry in and out of the freezer though (a good workout for the arms!). Me and my friends actually couldn't finish one big piece because it was quite filling but I did see their eyes sparkle and their mouths open when they saw it. Even my mother called it a masterpiece (she doesn't usually like chocolate). And can I tell you, it was so HARD to cut so next time I would have to dip the knife into hot water to cut it more easily.


What did you say? How did I make it? Well, it was probably the most time consuming and challenging cake I have ever done because it is ice cream, so it needs to be kept in the freezer to prevent it from melting into a gooey puddle as well as ruining the other layers. There are also many elements to this cake so I had to start making it the day before my friends were due to visit and it took me almost all day. I'm warning you, for those who want to lose weight shouldn't try this, because it made us (including me) feeling bloated and really full afterwards. But it really is the best cake I've ever made so far and it did leave the guests happy. If you still want to go ahead and create this, I suggest serving small pieces and eating them a little at a time, although it does look tempting doesn't it?
For the cake, I used Rosie of Sweetapolita's recipe as a guide and adapted it to become a little bit more complicated. But of course you could follow her recipe if you would like to recreate her cake. I changed the instructions a bit below though if you would prefer making this. I made homemade ice cream, which I used the 2 batches of the same recipe as my Easy Peasy Ice Cream but you could buy it if you don't have enough time. I kept the first layer plain vanilla and the other layer with some nutella in it to make it chocolatey. I didn't add chocolate to the sides and to the biscuit base though like Rosie did because I thought it had enough chocolate in it. I also made the brownie but cut it into half as it was pretty thick and as a result, my poor springform cake pan nearly overflowed with all of the layers.

Double-Decker Ice Cream Cake
Adapted from Sweetapolita's Double Chocolate & Banana Ice Cream Cake:

Ingredients:
Biscuit base
1/2 cup (1 stick, 115 g, 4 ounces) unsalted butter, melted
1 1/2 packages chocolate biscuits (9 ounce/255 g packages totaling 14.5 ounces/382 g) OR 14.5 ounces/382 g of Oreo cookie crumbs

Ice cream filling
3 1/2 cups of vanilla ice cream, slightly softened
3 1/2 cups of chocolate ice cream, slightly softened

Chocolate ganache
1/2 cup (4 liquid ounces) whipping cream (heavy cream, 35%)
6 ounces (170 g) premium bittersweet (extra dark) or semisweet (dark) chocolate
White chocolate shavings (optional)

Brownies       
6 1/2 ounces (185 g) bittersweet chocolate, chopped (I used 3/4 cup cocoa powder instead but if you're using the chocolate, omit the cocoa)
1 1/2 sticks (173 g) unsalted butter
1 2/3 (332 g) cups sugar
1 cup (140 g) all-purpose flour
3 large eggs
1 teaspoon (5 mL) pure vanilla extract
pinch of salt

Method:
Biscuit base
1. Grind the chocolate biscuits in a food processor until they become fine crumbs (unless you are using store-bought cookie crumbs).

2. Gently stir cookie crumbs into the melted butter until just combined. Set 1 cup (8 liquid ounces) of the mixture aside, and press remaining crumbs onto the bottom of an 8-inch round springform pan. Place in freezer until firm.

Brownie
1. Preheat oven to 163°C. Line an 8″ round pan with baking paper (leave some overhang for easy removal).

2. Melt the butter (and chocolate if you want) in a heatproof bowl over a small pot of simmering water. Stir occasionally until melted and smooth.

3. Remove bowl from the heat, and add the sugar, stirring until well incorporated. Add the flour (and cocoa if you're not using chocolate) and stir until well combined. Lastly, stir in the eggs, vanilla, and salt, and mix until thick and smooth.

4. Spread the batter among your pan evenly with a small offset palette knife and bake until the surface of the brownie is cracking and flaky for about 30 minutes. The centre of the brownie may not be cooked, but it will harden when it cools.

5. Cool it completely in pan on wire rack. Chill in pan, then remove using baking overhang.

Glaze
1. Warm cream in small saucepan over medium heat until it just begins to bubble.

2. Add chocolate and whisk gently until smooth. Let it cool for about 45 minutes.

Assembly:
1. Spoon the chocolate ice cream onto the frozen crust and spread evenly with an offset palette knife (you will want to place the bowl of remaining ice cream into the freezer while you work on the first half).

2. Sprinkle and gently press the reserved crumb mixture on top, followed by one of the halved brownie layer. Freeze for about an hour.

3. Place remaining ice cream on top, and then the other brownie layer and freeze for about 4 hours.
4. Warm bowl of glaze over simmering water until it is pourable but not too warm.

5. Spread over top of the whole cake with the small offset palette knife.

6. Sprinkle with chocolate shavings or your own decorations while the ganache is still wet. Freeze overnight.

7. Loosen sides of cake with a small knife between pan and cake, then release from springform pan, and place on plate or cake stand.

*Note that if you don't want to include the brownie, simply omit it but it adds a chewy texture to the cake and it heightens the other flavours. You can use a different biscuit base or add your own ice cream flavours instead of vanilla and chocolate to the cake. The options are endless so be creative!
Free Blog Template by June Lily