Showing posts with label chocolate. Show all posts

December 28, 2016

Unicorn Cake

Time goes by so quickly, doesn't it? I just completed my third year at uni and yet it almost feels like I was snapping away on my little compact camera when I first started blogging last weekend. Now on summer holidays, I've been looking for inspiration for new baking ideas and happened to stumble upon this gem by Cupcake Jemma.  

Now I thought to myself, this beauty should be easy to make. NOPE. The vanilla cake I had baked turned out dense, undercooked and just awful. My first batch of rainbow meringues had too much colour on them and took FOREVER to bake. I only realised my mistake of ignoring a bit of undissolved sugar in the meringue after they came out as hard as a rock when I actually thought that they were still undercooked. *Insert -_- face here*. Oh, and also, do not make these meringues on a humid day, I repeat, not on a humid day! The humidity messes with the sugar in the meringues and makes it sticky on the outside which ruins the appearance and colour on these beauties. 
After a day of baking disasters, it felt like my 5 years+ of baking experience went out of the window. But as they say, when you fall you gotta pick yourself up am i rite? So this time I opted for my trusty chocolate cake with strawberries and cream filling. I tried out a recipe from the Cake Merchant because creaming butter and sugar, when done correctly, almost always ensures a light and fluffy cake. I used a basic recipe for rainbow meringues from Bakers Royale but halved the recipe because I only needed a small amount of "unicorn poop" to top my cake. You can see how these meringue kisses are made from this video. For the outside of the cake, I used a vanilla buttercream frosting which I coloured pink, yellow and blue. 

I'm usually a sucker for simple cakes but you know, I could get used to making these kind of colourful beasts. 

July 22, 2015

Chocolate and Cherry Cake

Chocolate and cherries are my favourite combination - you've probably seen it already in my Black Forest Cake and even in my blog name, Cherry Choc Cupcake. What I love about this combo is that the fresh cherries offset the sweetness of the chocolate and helps balances the flavours of the cake perfectly. Think of moist, chocolate cake sandwiched in between cream and fresh cherries and topped with luscious milk chocolate ganache. 
Coming up with the idea of this cake came from my desire to play on the classical Black Forest Cake. Reserving the same flavours, yet introducing a new element to the cake was my main focus. After some random searching on Youtube, I saw a video that displayed the creation of "chocolate bark" and I was instantly sold. What about creating a cake that gave an impression of cutting into a tree log with hidden goodness inside? Obviously it doesn't look like a tree log, but it's close enough with the chocolate bark in place. 
Putting the cake together was simple as I used my go-to chocolate cake recipe from Sweetapolita. However, instead of baking the cake in 3 separate tins, I baked them in 2 and cut each layer in half after cooling them down. The filling is just whipped cream with pitted, chopped cherries and the chocolate ganache is milk cooking chocolate melted with heated cream. Creating the chocolate bark was super easy - just melt or temper dark cooking chocolate and pipe rows vertically next to each other on baking trays lined with baking paper, leaving space in between each one. Use a spatula knife to smooth out the chocolate and to create the ripples needed to realistically resemble actual bark. Once the chocolate has fully set, assemble the cake with layers of chocolate cake, cream filling and top with chocolate ganache. Then carefully place the chocolate bark around the cake, pressing them slightly against the cake to secure them in place. Top with fresh cherries and refrigerate until ready.

Chocolate and Mascarpone Cupcakes


These cupcakes are dark. They're seductive. They boast the creaminess and slight tanginess of the mascarpone cream. And to top it off, they've got a luscious, sweet butterscotch sauce to add some luxury to the otherwise dull cupcakes. The idea of pouring caramel sauce over cupcakes is not new - but my main inspiration for it was from Call Me Cupcake. The stark contrast of the cream and caramel sauce against the intense, dark chocolate cakes caught my eye. It's simply stunning to the eye and heavenly for the mouth. 


For the dark chocolate cupcakes, I used this recipe from Add a Pinch and found that it gave me excellent results. Moist, chocolate-y and moreish, this is my go-to chocolate cupcake recipe. The frosting is super easy and should be used straight away - just whip with an electric mixer about 226 grams of mascarpone cream with 1 cup of thickened cream and 1 teaspoon of vanilla extract. Once it reaches soft peaks, gradually add 1/2 cup of icing sugar/powdered sugar and whip until firm peaks. You'll see it hold its shape when you lift the whisk. Be careful not to over-whip it, or the cream will curdle and turn into butter!


For the butterscotch sauce, I used this recipe from Just a Taste.  I definitely felt that I could've taken the butterscotch sauce a bit further for a more intense caramel flavour and colour but was pleasantly surprised at how well the sauce complemented the cream in its original state. Once the cupcakes are baked and cooled, pipe the cream and pour over the butterscotch sauce. For extra decadence, add a pinch of salt. Voila!   


February 7, 2015

Chocolate and Strawberry Pocky Cake

Chocolate and strawberries are a modern, yet classical combination. Especially in a cake - where the tartness of the strawberries helps balance out the richness of the chocolate, and the sweetness of the buttercream. It might sound cliché, but it is, I believe, a match made on Earth for those romantics out there (hahaha....nope?).
This cake captures the essence of the chocolate and strawberries - an idea presented to me by my adorable best friend and university buddy K, who I am proud to dedicate this cake and post to. After going through some of the toughest times in my life, K was there to listen, give advice and ultimately helped me get through it. Also, props to K for helping me assemble and decorate the cake!!
The strawberry pocky decoration was inspired by two of my favourite bloggers - Raspberri Cupcakes and Sprinkle Bakes. After seeing the cake on the blogs for the first time, I immediately added it to my long baking list that always seems to end up at the bottom of my cupboard. Going through the list was like uncovering buried treasure because it contained some recipes I even forgot that I added a few years back.
Since chocolate and strawberries were the theme for this cake, an idea popped in my head to have chocolate cake layers, filled with fresh cream and strawberries, covered in strawberry swiss meringue buttercream and encased in strawberry pocky sticks. What I love about this cake is that the strawberry pocky - I used 4 boxes - helps to cover the messy frosting underneath and removes the hours (okay - maybe minutes if you're pro) to smooth out the frosting.
I used my go-to chocolate cake recipe by Sweetapolita, which always results in a rich, moist, chocolatey cake. I love swiss meringue buttercream - the silky texture compliments the cake and its subtle sweetness avoids the whole cake from tasting sickly sweet. Although it can taste quite buttery due to the large amount of butter, I found that the strawberry puree helps cut the taste of butter and gives it a fresh tart flavour. You can find the recipe here. I'd like to believe that love = chocolate + strawberries....


November 19, 2013

Black Forest Cake


I never expected the amount of excitement that would come around getting a new camera. Before its arrival, I spent countless hours watching videos and reading tutorials to prepare myself to step into the wonderful world of DSLR photography. Additionally, I signed up for a food photography e-course by Minimalist Baker and can say that it has been an extremely helpful asset towards exploring the new possibilities brought up by the camera. Prior to that, I used a point-and-shoot camera, which served me well for a few years as a beginner, until I began to recognise its limitations in both image quality and shooting speed. After finally completing school, I gathered the money I saved up for the past few years to invest in a good camera, forming an admiration for the Canon 100D as the smallest and lightest DLSR camera on the market; perfect for my small hands. The camera exceeded my expectations and hopes for beautiful photography, so much so, that I baked my own version of a Black Forest Cake to welcome it as the first of many posts to feature pictures taken with my camera.


The cake itself is adapted from Sweetapolita's one-bowl chocolate cake recipe, wherein it beholds a moist, dark chocolate crumb that is easy to bake as it is to eat. Although the intensity of the chocolate depends on the cocoa powder, it is a great cake to whip up for those sudden chocolate cravings. It is also one of those cakes that stays moist in the fridge for days (if it even lasts that long!), so it is perfectly fine to bake and freeze the cake layers ahead before frosting and decorating. And the frosting, is non other than swiss meringue buttercream flavoured with dark chocolate. Luckily I had planned ahead, using the egg yolks for salted caramel ice cream, which was unfortunately out of the running to be photographed. While the buttercream turned out with a lighter chocolate colour and intensity, it was heavenly silky, smooth and melted in the mouth as if it was made out of chocolate clouds. It's amazing how swiss meringue buttercream can be so delicious without being all gritty and unpleasant like the sugary powdered-sugar frosting.  


Inside the cake is layers of vanilla whipped cream filling with fresh cherries, adding a juicy burst of cherry goodness in every bite. Light, airy, whipped cream accentuating subtle sweetness is a traditional component, yet the combination of it with chocolate swiss meringue buttercream adds a modern take on the classic Black Forest cake. The chocolate trees I had piped for the collar is somewhat borderline between messy and elegant. I mean, it's pretty inconsistent regarding the design and size of each tree. But it does kind of cover up my impatience on getting a perfectly smooth and even surface. Plus I was running out of time to take advantage of the beautiful sunlight streaming through the window. In the end, the piping was messy as the buttercream had become soft by the time I had frosted the cake, but the cake overall tasted pretty good. Also, I noticed that the frosting on the outside of the cake was too thin and needed more frosting to cover up. Other than that, I'm pretty happy with it, and hopefully you may want to give this cake a try; its worth the extra time and effort!


One-bowl chocolate cake
Makes one 6-inch, 3 layer cake 
Adapted from Sweetapolita

Ingredients:
  • 1 and 1/2 cups of plain (all-purpose) flour (180 g)
  • 1 cup of sugar (225 g)
  • 1/2 cup of cocoa powder (60 g)
  • 1 and 1/4 teaspoons of baking powder (6 g)
  • 1 and 1/4 teaspoons of baking soda (6 g)
  • 1/2 teaspoon of salt (2.5 g)
  • 140 ml of milk
  • 130 ml of strong, hot brewed coffee OR boiled water
  • 75 ml of vegetable oil
  • 2 eggs, room temperature 
  • 1 tablespoon of vanilla extract (15 ml)

Method:
  1. Preheat the oven to 180 degrees C (350 degrees F). Grease three 6-inch round cake tins with melted butter, placing baking paper rounds on the base of each tin.
  2. Sift all the dry ingredients in the bowl of an electric mixer.
  3. Briefly whisk together all the remaining wet ingredients in a jug for easy pouring.
  4. Using the paddle attachment on the mixer, mix the dry ingredients on medium speed for 2 minutes.
  5. Slowly pour the liquid from the jug prepared earlier into the mixture and mix until combined. If there are any lumps, continue mixing until the batter is smooth. 
  6. Evenly divide the mixture between the three pans using an electronic scale, and bake in the preheated oven for 20 minutes. 
  7. Rotate the pans in the oven, and continue baking for about another ten minutes. The cakes are ready when a toothpick inserted in the center comes out with a few crumbs.
  8. Cool the cake layers on a wired rack for 15 minutes, turning them out to completely cool. If the cakes are domed, you may try to use a clean tea towel to gently push down on the dome to flatten it immediately after they have come out of the oven.

Chocolate Swiss Meringue Buttercream


Ingredients:
  • 5 large, fresh egg whites (150 g)
  • 1 cup of sugar (225 g) with two teaspoons taken out
  • 200 g of unsalted butter, at room temperature and cut into cubes
  • 1 teaspoon of vanilla extract (5 ml)
  • 200 g of chopped dark chocolate (300 g if you want a more intense chocolate flavour)
Method:
  1. Melt the chocolate in a heatproof bowl over a pot of simmering water, or in a microwave, stirring at 20 second intervals until smooth. Set aside to cool.
  2. In a heatproof bowl set over a pot of simmering water, whisk the egg whites and sugar together until the temperature reaches 65.5 degrees C (150 degrees F) or until the sugar has dissolved completely and the egg whites are hot to touch.
  3. Transfer the egg whites to the bowl of an electric mixer. Using the whisk attachment of the mixer, whisk the mixture at high speed to firm peaks until the meringue is thick, glossy and the bottom of the bowl feels neutral (not warm).
  4. At medium speed, add the butter cubes one at a time, until incorporated. Mix until it reaches a silky smooth texture. If the mixture has curdled, continue mixing until it becomes smooth again. If the mixture is runny, refrigerate it for about 15 minutes and continue mixing until it comes back together.
  5. Add vanilla, and then add the melted and cooled chocolate at medium speed until combined.

For the vanilla whipped cream filling, whisk 420 ml of cold thickened cream, 1/4 cup of powdered (icing) sugar and 2 teaspoons of vanilla extract with an electric mixer to firm peaks (it should hold its shape) until combined. 

For the chocolate trees, melt 200 g of dark/milk chocolate and fill it into a piping bag with a small, round tip. Pipe trees of about 3 inches tall on a baking tray lined with baking (parchment) paper. Extra chocolate may be melted again and reused for other purposes.

Assembly of Black Forest Cake


  1. Using a cake turntable, place a cake layer on a circular cake board. With an ice cream scoop, add one scoop of whipped cream filling onto the cake and evenly spread it out with an offset palette knife. Spread a few pitted fresh cherries on top and add another scoop of cream on top of the cherries, smoothing it out. 
  2. Repeat the step for another layer, placing a cake layer on top of the cream and adding the cherries.
  3. Fill the spaces in between the cake layers with more whipped cream.
  4. Refrigerate the cake for about 15 minutes.
  5. Add a scoop of chocolate swiss meringue buttercream on top of the cake, smoothing out and applying to the sides of the cake until thinly covered to seal in the crumbs. Refrigerate for at least 30 minutes.
  6. Add more buttercream to the sides of the cake to form a somewhat thick layer, using an offset palette knife and bench scraper to achieve a smooth surface.
  7. Pipe a buttercream border using a 1M star tip.
  8. Chill the cake to set for at least 2 hours.
  9. When ready to serve, carefully peel the chocolate trees from the baking paper and place them on the sides of the cake.
  10. Serve the cake at room temperature, carefully slicing the cake in between each chocolate tree.


November 10, 2013

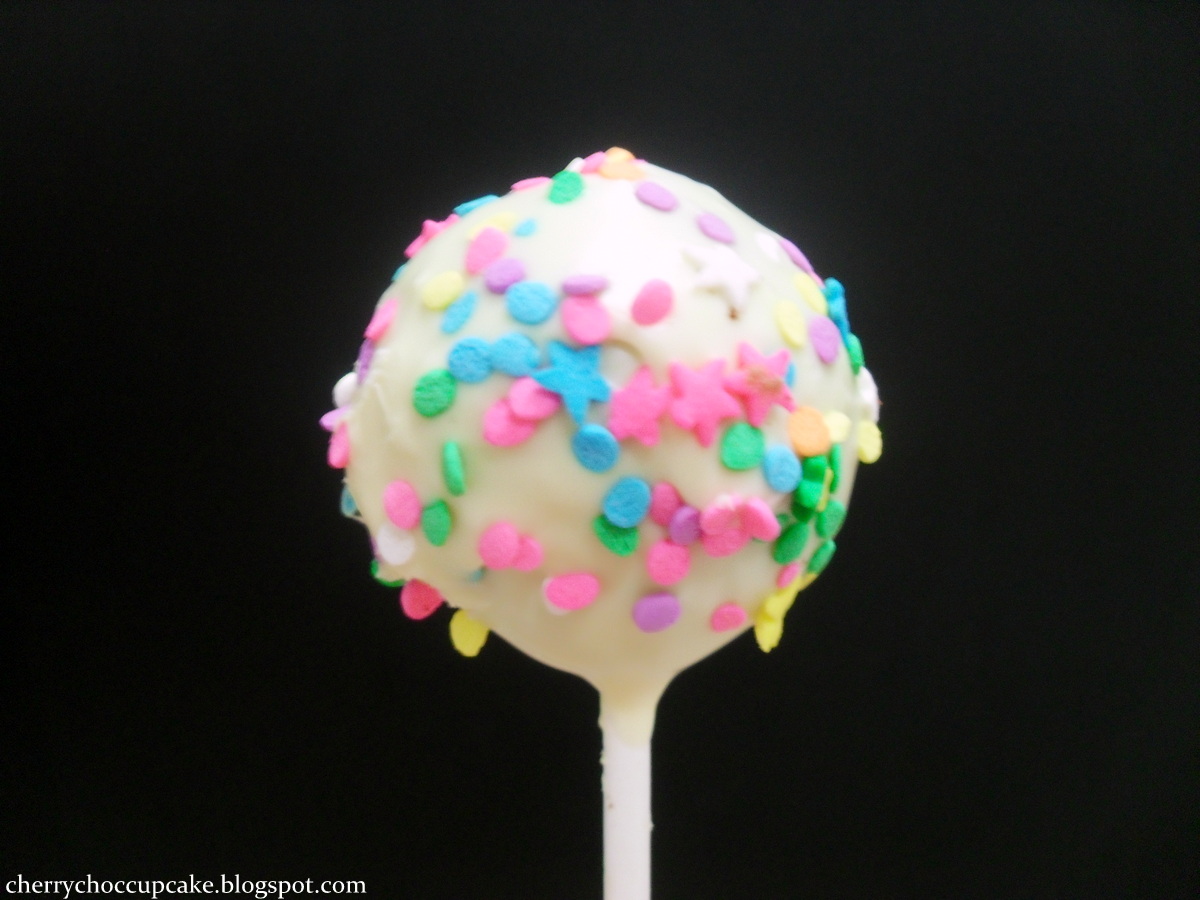
Double Chocolate Cake Pops


I made these cake pops in the past weekend for a party, wrapped in cellophane bags with a cute ribbon entitled "EAT ME". I still can't get my head around why I didn't make these treats earlier. But all the steps involved did make it seem a little tricky and fiddly to create; the rolling of the cake balls, inserting the lollipop sticks, freezing them, dipping them in chocolate and finally decorating them with sprinkles. Even with the amount of work to make them, they are worth the effort and seem to be simple and easy to make. For my first try, I think it was a success.


These cake pops were demolished by the kids, I mean everyone thought white chocolate and nutella chocolate cake go hand in hand. Funnily, one of the kids called it as one of those massive chupa-chups "lollipop" before I told her it was basically a cake ball on a stick. Brilliant idea to whoever came up with cake pops.


It was pretty frustrating when some of the cake pops fell apart or refused to be held by a lollipop stick, even after spending some time in the freezer. I was able to save the best ones by re-shaping them into balls and forcing the sticks to hold them in place. I also used small cups to dry the cake pops after dipping them in white chocolate as shown in the pictures, rather than styrofoam which I unfortunately didn't have on hand.

These chocolate cake pops held together by nutella and coated in creamy white chocolate make it the perfect treat for virtually any occasion. I found this easy recipe from Divas Can Cook and you can find her recipe here. Now please excuse me as I go grab one from the fridge...


September 16, 2012

Neapolitan Layer Cake

 
So I was invited to a party last week. I was so excited about it that I planned what to make 3 days in advance. It only seemed fitting that a neapolitan cake would wow the guests and act as a thank you gift to the party host for inviting us. Distinctive layers of chocolate, vanilla and strawberry that is most familiar to me in my childhood (actually in ice cream form and yes, I was spoilt for the amount of ice cream I was allowed to have). Strangely enough, I remember only eating the chocolate part and leaving out the rest for my mum. But now, I love neapolitan ice cream in its whole form and eat every part of it (my favourite is still chocolate!).


I was only able to take photos of the cake before transferring it to the cake carrier so that's why the frosting-covered baking paper is still stuck to the cake (I use it to easily lift the cake onto the container). So I would like to apologise for the mess I had to capture, which honestly is quite embarrasing to me...but the main component in the pictures is the cake, right?


So would you like to see what's hidden in this cake? Here it is, the three neapolitan layers! I was surprised to see it look so similar to its ice cream form, and it seems that my hard work has paid off. I had some problems with the strawberry swiss meringue buttercream, but it came out all right at the end. I think it was due to the amount of strawberry puree and butter it had in it. The cake was also a little dense, but it was a real crowd pleaser and by the end of the day, there was none left...not even crumbs. I was so happy to see people enjoying the cake and commenting on how good it looked. Looks like I'll have to make this cake again soon, applying some changes to the recipe.


Since I followed the recipe from Annie's Eats and only made minor changes to the cake (I didn't add strawberry gelatin to the strawberry layer), I will direct you to her site which has all the detailed instructions and information you need to make this. Check it out HERE.


June 1, 2012

Chocolate Cupcakes & Mint Chocolate Macarons


At the moment, mint and chocolate seems to be the flavour combination of my latest obsession. I didn't realise how popular they were until I saw them featured in ice cream, biscuits, slices, whoopie pies, cakes and even cupcakes! I wasn't a fan of them either. That is, until I tried a mint slice which is a chocolate-covered biscuit filled with a layer of mint cream inside. They worked so well together, and the mint was a refreshing component that perfectly assisted the sweetness of the chocolate. I also tried eating fresh mint leaves with blocks of chocolate just for fun, but that didn't work well like eating one of my favourite chocolate bars, Mint Aero.


I decided to feature my new love for mint chocolate in the form of macarons when I saw them in the book, Macarons: Chic and Delicious French Treats. I have been wanting to make these ever since I bought the book, and I was further inspired by Raspberri Cupcakes once again, with these adorable Heart Polka Dot Macarons & Vanilla Bean Blueberry Cupakes. I actually attempted to pipe heart shapes with the macarons but failed when they looked like deformed hearts. I'm going to stick with the regular round shapes for now until I perfect my piping skills. Using David Lebovitz's Devil's Food Cake recipe, I made a small batch of chocolate cupakes which were moist and chocolatey, perfect for pairing with mint.


The real star of the cupcakes are of course, the macarons which are filled with a lovely minty milk chocolate ganache. I used a bunch of fresh mint leaves I bought from the shop, just because I didn't have any peppermint extract on hand. The key to getting as much flavour from the mint possible is by letting the leaves infuse in the syrup for at least an hour. I let mine sit for about three hours, which was enough to bring out the minty-ness, but no too overwhelming as not to mask the flavour of the chocolate. And when it came to the macarons, I was sure to let them set until they formed a skin. But even that, a batch of the shells came out cracked and ugly. I was lucky to have another batch perfectly baked (maybe a tad over-baked) with feet and no cracks!


The frosting I used is new to me, and it is a cooked flour frosting from Tasty Kitchen that I actually wanted to try before I discovered the Best-ever-frosting. Unfortunately, it didn't work out for me as the mixture split and there was still lumps of flour present in the frosting. It also kind of melted a bit which did not hold its shape very well as shown on the cupcakes. However, it did taste delicious and wasn't too sweet or buttery at all, but I will go back to my favourite recipe for now as my go-to frosting.


Chocolate Cupcakes adapted from David Lebovitz's Devil's Food Cake.
Makes 10 cupcakes (double the recipe if you want 20 cupcakes)

Ingredients:
4 and a half tablespoons of cocoa powder
3/4 cup of cake flour (or plain flour)
1/4 teaspoon of salt
1/2 teaspoon of baking soda
1/8 teaspoon of baking powder
57 grams of unsalted butter, at room temperature
3/4 cup of sugar
1 large egg, at room temperature
1/4 cup of milk
1/4 cup of water

Method:

1. Preheat the oven to 180 degrees C (350 degrees F). Line a cupcake tray with cupcake liners.

2. Sift together the flour, cocoa powder, baking soda, baking powder and salt in a bowl and set aside. Mix the milk and water together in a bowl and set aside.

3. Beat butter and sugar with an electric mixer for about 5 minutes until fluffy and creamy. Add the egg and mix until combined.

4. Stir half of the flour mixture into the butter and add the milk and water to the batter. Stir in the other half of the flour mixture and mix until incorporated.

5. Fill the cupcake liners until half full. Bake in the preheated oven for 20-25 minutes until a skewer inserted into the centre of the cupcake comes out clean. Remove from the oven and cool in tray for 5 minutes, before placing the cupcakes on a wire rack to cool completely before decorating.

Mint Chocolate Macarons adapted from Macarons: Chic and Delicious French Treats by Annie Rigg
Makes 20 macarons

Ingredients:
200 grams (1 and 1/2 cups) icing/confectioners'/powdered sugar
100 grams (2/3 cup) ground almonds
3 egg whites
3 tablespoons of sugar
30 grams (about 1 bunch) of fresh mint leaves
Extra 3 tablespoons of sugar
200 grams of dark/milk chocolate, finely chopped
1/2 cup of water
Green food colouring paste


Make the mint-infused ganache first,

1. Lightly crush the mint leaves with your hands and add it to the extra sugar and water in a small saucepan.

2. Slowly bring it to the boil until the sugar dissolves and then simmer for about 3 minutes. Remove it from the heat and let it infuse for at least 1 hour (The longer it infuses, the more mint flavour will come out).

3. Bring the mint syrup back to the boil and and then strain the leaves into a heatproof bowl. Immediately add the chocolate to the syrup and mix well until smooth and melted. Let the mixture cool before putting it in the fridge for it to set and thicken up slightly.

To make the macarons,

1. Sift icing sugar and ground almonds in a bowl and set aside.

2. Beat the egg whites with an electric mixer in a clean bowl with a pinch of salt. Whisk until it just holds a stiff peak.

3. Add the sugar to the meringue while beating at a medium-high speed a teaspoonful at a time. Mix well between each addition. Add the green food colouring to the mixture and stir well until the colour is evenly distributed.

4. Fold the icing sugar and almond mixture into the egg whites until incorporated and smooth.

5. Fill a piping bag with the mixture and pipe evenly sized circles of about 2 inches wide in diameter on a baking/parchment paper lined baking tray.

6. Tap the bottom of the baking trays sharply and leave the shells to set for about 1 hour or until they have set and formed a shell. They should not be sticky or wet when touched with your finger.

7. Preheat the oven to 170 degrees C (325 degrees F) while the macarons are drying. Bake the shells for about 10 minutes, until they are crisp and dry. Cool completely before filling with the ganache.

8. Take two similar sized shells and sandwich them together with the prepared mint ganache filling. Repeat with the rest of the shells.

Vanilla cooked flour frosting adapted from Tasty Kitchen
Double the recipe if you like lots of frosting

Ingredients:
2 and a half tablespoons of plain flour
1/2 cup of milk
1/2 teaspoon of vanilla extract
1/2 cup of sugar
113 grams of unsalted butter
Green food gel colouring

Method:

1. Pour milk in a small saucepan and whisk the flour into the milk until combined.

2. Heat the mixture over a medium heat until it is very thick and creamy. Cool the mixture completely by letting it cool in the fridge or putting it over an ice bath.

3. Add vanilla extract to the cooled mixture and stir to combine.

4. Beat butter and sugar together with an electric mixer until light and fluffy.

5. Add the cooled flour mixture to the butter and whip on a medium-high speed until it looks like whipped cream. Add colouring and mix well to distribute the colour evenly.

To assemble the cupcakes, pipe a swirl with the frosting and top with a mint chocolate macaron.


May 13, 2012

Chocolate Heart Whoopie Pies


For those of you who aren't into the baking trends, whoopie pies may be new to you. So what is a whoopie pie? It's basically two cookie-like cakes sandwiched together with a delicious creamy filling. They are a combined version of cookie and cake and are taking over the baking world by storm, becoming increasingly popular among bakers. Traditionally, whoopie pies are made with a marshmallow filling but I decided to give it a modern twist and use classic buttercream instead. No one likes bland food, especially when it comes to sweet treats. And what's my version of whoopie pies without a little surprise inside?


Thanks to Not Quite Nigella's recipe, I was able to reproduce some delicious chocolate whoopie pies. It was the first time I've ever made these treats, and I'm glad that I did! They however, came out a bit too large for me so I decided to cut out heart shapes with my cookie cutter and split each in half, which explains why there are so many crumbs. You can cut out other shapes or have these in their regular circle shape and fill them with your favourite frosting or filling. You could even try strawberry and cream whoopie pies like the traditional scones!


I wanted to surprise my tasters with a strawberry-flavoured marshmallow hidden inside, surrounded by the creamy buttercream. It was a delicious treat with a nice chocolatey moist crumb which was complimented by the filling and heart-shaped marshmallow. The dark chocolate chips added in the batter were a nice addition and took the whoopie pies to another level. Next time I might try adding in white or milk chocolate chips, or even sprinkles for a funfetti version.


They may not be too pretty or fancy, but they are certainly tasty and worth to try. There are so many flavours and versions of whoopie pies from pumpkin to red velvet to choose from, that it may be time to try another one soon!


Chocolate Whoopie Pies adapted from Not Quite Nigella.
Makes about 12 whoopie pies

Ingredients:
125 grams unsalted butter, at room temperature
1 large egg
1 cup of milk
1 cup of brown sugar
1 teaspoon of vanilla extract
1/2 teaspoon of salt
2 cups of plain/all-purpose flour
1 and 1/4 teaspoon of baking soda
1/2 cup of cocoa powder
1/3 cup of chocolate chips


Classic Vanilla Buttercream from Savory Sweet Life.

Ingredients:
226 grams (2 sticks, 1 cup) unsalted butter, softened
3 to 4 cups of confectioners' (icing, powdered) sugar, sifted
1/4 teaspoon of salt
1 tablespoon of vanilla extract
2 to 4 tablespoons of milk/cream

To make the whoopie pies,
1. Preheat the oven to 180 degrees C (350 F). Using an electric mixer, cream butter and sugar together until light and fluffy. Add the egg and vanilla extract and beat well until creamy.
2. In a bowl, sift together flour, baking soda, cocoa powder and salt and set aside.
3. Add the flour mixture to the butter mixture, alternating in three parts with the milk and mixing well after each addition. Stir in chocolate chips and mix to combine.
4. Use a greased whoopie pie pan and fill the moulds with batter, OR use a 1/4 cup ice cream scoop and drop 12 balls of batter, about 6 inches apart, onto a baking paper lined baking tray. You can also pipe them with a piping bag if you're a neat baker.
5. Bake in the preheated oven for 12 minutes until a skewer inserted in the middle is clean or they spring back when lightly pressed. Remove from oven and cool completely on a wire rack before filling or decorating.

To make vanilla buttercream,
1. Beat butter with an electric mixer on medium speed for a few minutes until pale and creamy. Turn the mixer to a low speed and add 3 cups of the icing sugar and mix until incorporated.
2. With the mixer at a medium speed, add the vanilla extract, salt and 2 tablespoons of milk/cream and beat for 3 minutes. Add another cup of icing sugar for a more stiff consistency or add the rest of the milk/cream a tablespoon at a time.

Assemble the whoopie pies by piping or spreading some buttercream on one cake and sandwiching it with another. Decorate as you like with icing, sprinkles or sifted cocoa/icing sugar on top!


April 15, 2012

Marshmallow Chocolate Cupcakes


Pair soft and not-too-sweet marshmallow with a beautifully light and chocolatey cupcake and you have a wonderful yet playful treat! Actually, it is marshmallow fondant that tops these super cute cupcakes. After trying one and getting a lot of positive feedback from my friends, I declared them as one of the best creations I have ever made...not to mention amazingly delicious and simple to make. I made these to take with me to a park I was going with my friends and I desired to make something colourful and pretty like the homemade candy hearts and stars I made a while ago.


The inspiration of this idea came from flicking through the 'Cupcakes by Colour' book by the Australian Women's Weekly. This book is the first place where I look for decorating cupcake ideas. One particular cupcake that caught my eye looked similar to this but was just blue and white stars so I adapted this idea to make more colourful and attractive cupcakes with the addition of hearts. Then applying marshmallow fondant to the cupcake instead of traditional fondant as suggested just made sense and it fit into my plan perfectly.


It worked so well when matched with the perfect chocolate cupcake I found from Glorious Treats. I also had my eye on the marshmallow fondant Bakingdom used for her cakes until I finally got my hands on a packet of vanilla marshmallows. That's when I really started to get creative with the help of the marshmallow fondant recipe by Clockwork Lemon. I got my four gel colours out and added a little to each portion of fondant that I divided by weighing (I love my kitchen scales). Then I cut out hearts and stars (the same cutters I used for the candies) from each coloured dough, replacing the cut-out shapes into the cut out pieces of dough.


The instructions also stated that you should slather some buttercream icing or ganache on top of the cupcake to adhere the fondant but I didn't think that was necessary as the cupcakes were already sticky on the top which helped the fondant to stay in its place. These cupcakes were gone in a flash and everyone loved them. I am already being asked to make another batch of these cupcakes so I highly recommend that you to try out these treats soon!


Perfectly Chocolate Cupcakes recipe by Glorious Treats

Makes about 24-27 cupcakes

Ingredients:

2 cups of sugar
1 and 3/4 cups of plain or all-purpose flour
3/4 cup of unsweetened cocoa powder
1 and 1/2 teaspoons of baking powder
1 and 1/2 teaspoons of baking soda
1 teaspoon of salt
2 eggs, at room temperature
1 cup of milk
1/2 cup of vegetable oil
2 teaspoons of vanilla extract
1 cup of boiling water

Method:

1. Preheat the oven to 180 degrees C (350 degrees F) and line muffin trays with cupcake liners.

2. In a large bowl, sift together flour, cocoa, baking powder and baking soda. Add sugar and salt and stir until combined.

3. Stir in the eggs, milk, oil and vanilla and beat for one minute or until incorporated.

4. Add the boiling water to the mixture and mix together thoroughly until it is a shiny thin batter.

5. Fill the cupcake liners with the batter until 2/3 full.

6. Bake in preheated oven for about 22-24 minutes or until a skewer inserted into the centre is clean.

7. Remove the cupcakes from the tray and allow them to cool completely on a wired rack before topping them with marshmallow fondant.

Marshmallow fondant by Clockwork Lemon

Makes just enough to decorate about 20 cupcakes.

Ingredients:

250 g packet of vanilla marshmallows (or any other flavour of your choice)
Icing or confectioner's sugar (the amount can vary so make sure you have an entire bag on hand)
Food gel or colouring

Method:

1. Put the marshmallows in a large microwavable bowl and sprinkle teaspoons of water to make them a little moist.

2. Microwave the marshmallows for ten seconds at a time, stirring with a greased wooden spoon until it has melted and puffed up enough to be sticky (for me it was about a minute in the microwave).

3. Start adding the icing sugar to the marshmallow mixture and stir, adding more each time until it becomes a soft and fluffy dough. Grease your hands if it becomes too sticky and transfer the mixture to a icing-floured bench. Keep adding icing sugar while kneading until it is stiff enough to roll out but be careful not to add too much icing sugar. If it is too stiff and breaks easily, add butter or stick it in the microwave for about 2 seconds.

4. Portion the finished fondant dough by weighing the whole piece and dividing that by 4 (it depends how many colours you desire). Roll out the dough briefly and add a little food colouring in the middle. Start kneading and wear plastic gloves if you don't want your hands coloured until the colour is distributed evenly, making sure that the other pieces of dough are wrapped tightly with plastic wrap.

5. Roll out each piece of coloured fondant to about 5 mm thick or a little less. Cut out shapes with your tiny cutters (about 3 cm in diameter) slightly close together. Put these shapes in a zip lock bag while you do the rest. Alternate the shapes and place them in the cut out holes of all of the coloured portions of fondant. Roll it again to ensure the shapes are in place.

6. Cut out rounds of fondant from each colour with a 7 cm round cookie cutter (or a similar size that fits the cupcakes) and carefully place each piece on top of the cupcakes, pressing them slightly in place.

Free Blog Template by June Lily