Showing posts with label strawberry. Show all posts

December 28, 2016

Unicorn Cake

Time goes by so quickly, doesn't it? I just completed my third year at uni and yet it almost feels like I was snapping away on my little compact camera when I first started blogging last weekend. Now on summer holidays, I've been looking for inspiration for new baking ideas and happened to stumble upon this gem by Cupcake Jemma.  

Now I thought to myself, this beauty should be easy to make. NOPE. The vanilla cake I had baked turned out dense, undercooked and just awful. My first batch of rainbow meringues had too much colour on them and took FOREVER to bake. I only realised my mistake of ignoring a bit of undissolved sugar in the meringue after they came out as hard as a rock when I actually thought that they were still undercooked. *Insert -_- face here*. Oh, and also, do not make these meringues on a humid day, I repeat, not on a humid day! The humidity messes with the sugar in the meringues and makes it sticky on the outside which ruins the appearance and colour on these beauties. 
After a day of baking disasters, it felt like my 5 years+ of baking experience went out of the window. But as they say, when you fall you gotta pick yourself up am i rite? So this time I opted for my trusty chocolate cake with strawberries and cream filling. I tried out a recipe from the Cake Merchant because creaming butter and sugar, when done correctly, almost always ensures a light and fluffy cake. I used a basic recipe for rainbow meringues from Bakers Royale but halved the recipe because I only needed a small amount of "unicorn poop" to top my cake. You can see how these meringue kisses are made from this video. For the outside of the cake, I used a vanilla buttercream frosting which I coloured pink, yellow and blue. 

I'm usually a sucker for simple cakes but you know, I could get used to making these kind of colourful beasts. 

February 22, 2015

Strawberry and White Chocolate Cupcakes


This is my second post in a row featuring strawberries, which might or might not be due to the abundance of these berries at the moment. I just love how they freshen up a baked good and add a slightly tart flavour to take away some of the sweetness. You might notice that I'm always trying to come up with a way to reduce the amount of sweetness in a dessert or baked treat - because, in reality, nobody likes sickly sweet food. In my early baking days, all of my sweets were either full of butter or sugar. Like this multi-coloured rainbow cake I made a few years ago. On a side note, it's my 3rd blogiversary! It's hard to believe that three years ago, I was once a 15 year old girl with a burning passion to bake and whip up desserts. I remember being successful at my first attempt at making macarons with my very first blog post back in 2012 and I've always been baking since. Had cherries been in season right now, I would've made some cherry chocolate cupcakes to celebrate. But there's always a next time right?

So, on to these cupcakes! I decided to use this recipe from the Cupcake Project for the vanilla cupcakes. Although I did get mostly vanilla-y, fluffy and moist cupcakes, I had a problem with some of the cupcakes shrinking from their cases. I dismissed the thought that it was the recipe and opted to blame the cupcake liners instead. Putting that aside, I made the cupcakes according to the recipe and mixed in chopped white chocolate and fresh strawberries to the finished batter. Viola! Mixing in white chocolate and strawberries makes ordinary vanilla cupcakes so much more special. 


For the frosting, I used my beloved swiss meringue buttercream for its silky texture and slight sweetness. And since baking is loads more fun with friends, I let my two best buddies decorate the cupcakes with swirls of icing and strawberry roses. Cupcakes to me, are truly the epitome of elegance and beauty. They are also small enough to not be guilty about the amount of sugar or fat eaten. With that being said, how can anyone reject a cupcake anyway?


And of course I would like to end this post with a smile from K and a peace sign. Peace out! 


February 7, 2015

Chocolate and Strawberry Pocky Cake

Chocolate and strawberries are a modern, yet classical combination. Especially in a cake - where the tartness of the strawberries helps balance out the richness of the chocolate, and the sweetness of the buttercream. It might sound cliché, but it is, I believe, a match made on Earth for those romantics out there (hahaha....nope?).
This cake captures the essence of the chocolate and strawberries - an idea presented to me by my adorable best friend and university buddy K, who I am proud to dedicate this cake and post to. After going through some of the toughest times in my life, K was there to listen, give advice and ultimately helped me get through it. Also, props to K for helping me assemble and decorate the cake!!
The strawberry pocky decoration was inspired by two of my favourite bloggers - Raspberri Cupcakes and Sprinkle Bakes. After seeing the cake on the blogs for the first time, I immediately added it to my long baking list that always seems to end up at the bottom of my cupboard. Going through the list was like uncovering buried treasure because it contained some recipes I even forgot that I added a few years back.
Since chocolate and strawberries were the theme for this cake, an idea popped in my head to have chocolate cake layers, filled with fresh cream and strawberries, covered in strawberry swiss meringue buttercream and encased in strawberry pocky sticks. What I love about this cake is that the strawberry pocky - I used 4 boxes - helps to cover the messy frosting underneath and removes the hours (okay - maybe minutes if you're pro) to smooth out the frosting.
I used my go-to chocolate cake recipe by Sweetapolita, which always results in a rich, moist, chocolatey cake. I love swiss meringue buttercream - the silky texture compliments the cake and its subtle sweetness avoids the whole cake from tasting sickly sweet. Although it can taste quite buttery due to the large amount of butter, I found that the strawberry puree helps cut the taste of butter and gives it a fresh tart flavour. You can find the recipe here. I'd like to believe that love = chocolate + strawberries....


September 27, 2012

Baked Strawberry Cheesecake


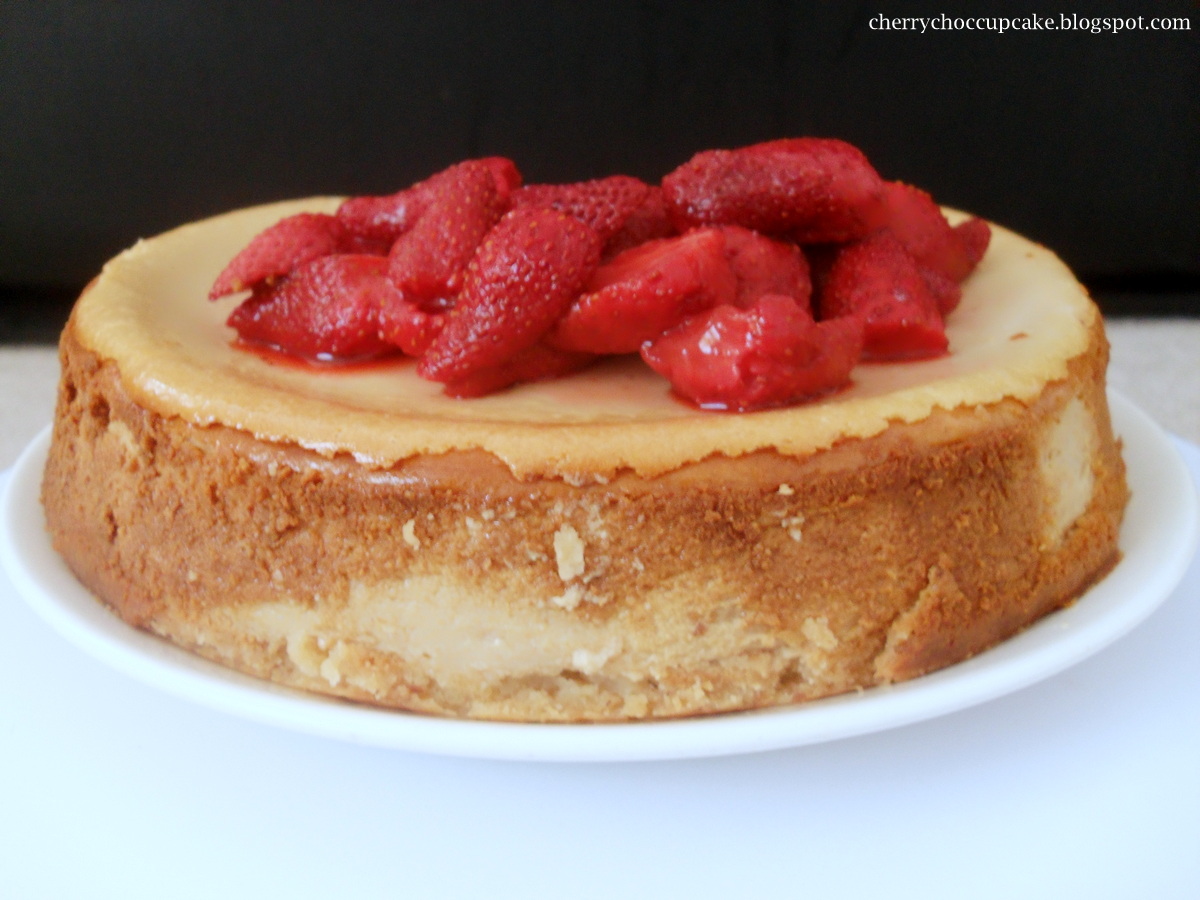
This is officially my favourite baked cheesecake. Think of luscious roasted strawberries with juices to die for, topped on a strawberry-flavoured cheesecake. It has ricotta in it, which makes it so light and fluffy compared to the only cream cheese ones. I actually first saw this on Raspberri Cupcakes, and I instantly wanted to make this particular one since I was craving for cheesecake recently. 


Strawberries are in abundance and are so cheap these days, which makes it perfect to use them for a cheesecake. I have never roasted fruits before, so I was a little skeptical of the idea of baking strawberries. But they came out so juicy and succulent, perfect for pairing with the cheesecake. Thanks to Steph (Raspberri Cupcakes), I will be roasting fruit more often now! You might have already seen it, but I tried to hide the ugly cracks on top of the cheesecake with the strawberries. This always happens to me whenever I bake a cheesecake.

 
I decided to use a recipe from Donna Hay for the biscuit base because I had run out of them and was too lazy to bake a batch. It came out fine, but probably next time I would use biscuits and process them up in a food processor for the base. It was just tasted a little bit more buttery to me...other than that, it was perfect, and next time I will definitely remember to buy more ricotta from the store for this cheesecake.


Baked Strawberry Cheesecake
Makes one 8 inch cheesecake

Adapted from Raspberri Cupcakes and Donna Hay.

Cheesecake filling
330 grams ricotta
500 grams cream cheese, softened
1 cup of strawberry jam
1 and 1/2 tablespoon of cornflour (cornstarch)
1 and 1/2 tablespoon of water
4 eggs

Base
1/3 cup of almond meal
3/4 cup of plain flour
1/4 cup of sugar
90 grams of butter, chopped

Strawberries
500 grams of fresh strawberries
3 tablespoons of brown sugar
2 tablespoons of apple cider vinegar

Method:

1. Preheat the oven to 150 degrees C (350 F). Make the base by combining almond meal, flour, sugar and butter in a food processor until a dough forms. Press the mixture with the back of a spoon on the base of a lined/greased 8 inch round springform pan. Bake for 15 minutes until light golden and set aside.

2. Make the filling by placing the cream cheese, ricotta, eggs and strawberry jam in the bowl of a food processor. Pulse until just combined. Combine the cornflour and water together in a small bowl and add to the cream cheese mixture. Process until smooth. Pour the filling over the biscuit base of the prepared cake tin and bake for 1 hour until golden and a little wobbly in the center. Turn the oven off and allow the cheesecake to cool in the oven for another hour. Transfer to a wired rack to completely cool.

3. Preheat the oven to 200 degrees C (390 F). To make the strawberries, hull and halve the berries and place them in a roasting pan. Add the brown sugar and toss to combine. Pour over the vinegar and toss again. Bake in the oven for 10-12 minutes until the berries soften and the juices are present. Allow to cool completely, then arrange on top of the cooled cheesecake before serving.


September 16, 2012

Neapolitan Layer Cake

 
So I was invited to a party last week. I was so excited about it that I planned what to make 3 days in advance. It only seemed fitting that a neapolitan cake would wow the guests and act as a thank you gift to the party host for inviting us. Distinctive layers of chocolate, vanilla and strawberry that is most familiar to me in my childhood (actually in ice cream form and yes, I was spoilt for the amount of ice cream I was allowed to have). Strangely enough, I remember only eating the chocolate part and leaving out the rest for my mum. But now, I love neapolitan ice cream in its whole form and eat every part of it (my favourite is still chocolate!).


I was only able to take photos of the cake before transferring it to the cake carrier so that's why the frosting-covered baking paper is still stuck to the cake (I use it to easily lift the cake onto the container). So I would like to apologise for the mess I had to capture, which honestly is quite embarrasing to me...but the main component in the pictures is the cake, right?


So would you like to see what's hidden in this cake? Here it is, the three neapolitan layers! I was surprised to see it look so similar to its ice cream form, and it seems that my hard work has paid off. I had some problems with the strawberry swiss meringue buttercream, but it came out all right at the end. I think it was due to the amount of strawberry puree and butter it had in it. The cake was also a little dense, but it was a real crowd pleaser and by the end of the day, there was none left...not even crumbs. I was so happy to see people enjoying the cake and commenting on how good it looked. Looks like I'll have to make this cake again soon, applying some changes to the recipe.


Since I followed the recipe from Annie's Eats and only made minor changes to the cake (I didn't add strawberry gelatin to the strawberry layer), I will direct you to her site which has all the detailed instructions and information you need to make this. Check it out HERE.


June 28, 2012

Ruffled Vanilla Celebration Cake


Since I wrote my last post on how to make macarons, I turned 16...yes, I aged a year! My birthday was this past weekend and even though I stayed home with my friends and family, I wanted to make a cake that has all the things I have ever wanted in one, including ruffles. I have always admired all the ruffle cakes I saw in the past, like this, this and this! Aren't they all pretty and perfect? Mine isn't too pretty like those ones, but I am happy enough with my first attempt. The strawberry swiss meringue buttercream was the real highlight of the cake because it was so delicious that it tasted like fresh strawberry ice cream. It was really light in texture and not too sweet or buttery (I decreased the amount of butter to only 200 grams and it worked!). It was the perfect choice for making ruffles on this cake. The traditional buttercreams use too much icing sugar to stiffen it up, which gives it an unpleasant gritty, overly sweet and buttery taste. That's why I rarely use it anymore.


At first, I couldn't decide what cake to bake since it was only going to be for me and my little family. I had some strawberries leftover so it became the perfect opportunity to try piping ruffles with strawberry swiss meringue buttercream. My main inspiration for this cake came from Diamonds for Dessert's ruffle blogiversary cake. Her post convinced me that ruffles aren't that hard or time consuming to create and perfect. But really, I had some difficulties with it since it was my first attempt. I piped the ruffles the first time and it ended up looking messy and uneven, so I scraped it off and started again. The second time round it came out okay but was still not as perfect as I wanted it to be. I figured out that it already looked good enough and I was tired of the thought of doing it again. 


I used the same white cake recipe from the White Vanilla Cake with Macarons because it turned out fluffy, moist and vanilla-y which would pair really well with the strawberry swiss meringue buttercream. But this time the cake turned out a little dry, so maybe next time I should try another recipe. Nonetheless, the strawberry jam in between the layers helped moisten it a little and added a beautiful flavour to the cake. The cake really did taste wonderful and I was very happy to have finally made a ruffle cake. The ruffles took up so much frosting though, so you would need to make a lot more for a larger cake. Just in case you were wondering, this mini cake is 5 and 3/4 inches in size which is perfect for a celebration to serve a small (I mean tiny) crowd of people.


White Vanilla Cake from Joy of Baking.
Makes 4 thin layer, 5 and 3/4 inch cake (if you want a larger cake, you should increase the recipe by 1.5 or 2 times)

Ingredients:

2 large eggs
1 and 3/4 cups of cake/plain flour
2 teaspoons of baking powder
1/4 teaspoon of salt
113 grams of unsalted butter, at room temperature
1 cup of sugar
1 teaspoon of vanilla extract
1/2 cup of milk
1/8 teaspoon of cream of tartar

Method:

1. Preheat the oven to 177 degrees C (350 degrees F). Line with baking paper the bottom and grease one 31.1 x 20.6 cm rectangular sheet pan. If you're doing a larger cake, prepare two or three 8 inch cake pans.

2. Separate the egg whites and egg yolks into different bowls and set aside.

3. Sift the flour, baking powder and salt into a large mixing bowl and set aside.

4. Beat the butter with an electric mixer until soft for about 1-2 minutes and add 3/4 cups of sugar to the butter, beating until light and fluffy. Add the egg yolks, one at a time until incorporated. Add the vanilla extract and mix again.

5. Alternately add the flour mixture and milk to the butter mixture in three additions, starting and ending with the flour.

6. In a clean bowl, beat the egg whites until foamy. Add the cream of tartar and continue beating until soft peaks form. Slowly add 1/4 cup of sugar to the egg whites and beat until stiff peaks form.

7. Gently fold a little of the meringue into the cake batter to lighten it first with a rubber spatula, and then fold in the remaining egg whites into the mixture until combined. Try not to over-mix or the batter will deflate.


8. Put the batter into the prepared pan/pans and smooth the surface with a small offset spatula. Bake for about 20-25 minutes until the top is golden brown and a toothpick inserted in the centre comes out clean.

9. Cool the cake in the pan for 10 minutes before turning it onto a wire rack to cool completely before assembling.


Strawberry Swiss Meringue Buttercream
Adapted from Diamonds for Dessert. (You would have to increase the recipe by about 1.5 or 2 times for a larger cake since the ruffles use lot of frosting)

Ingredients:

4 egg whites at room temperature
1 and 1/4 cups of sugar
200 grams of unsalted butter, at room temperature (the original recipe stated 339 grams of butter which is totally unnecessary since I tried adding a little less than 2 sticks of butter, which still worked perfectly!)
1 and 1/2 cups of fresh strawberries, pureed

Method:

1. Simmer some water in a small saucepan on the stove. Mix the egg whites and sugar in a heatproof bowl and put it over the pot so that it fits well. Whisk the mixture until it is hot and the sugar has fully dissolved (dip your fingers into the egg whites and rub them together, if it feels gritty, keep whisking).

2. Remove the bowl from the heat and pour into a bowl of an electric mixer. Alternatively, you could just leave it in the bowl if you are using a hand-held electric mixer. Beat on a medium high speed until stiff peaks form and the bowl has cooled down to room temperature for about 10 minutes.

3. Cut up the butter into small pieces and add them to the mixture a few pieces at a time, waiting for the butter pieces to incorporate before adding any more. Continue beating for a few minutes, and add the strawberry puree a little at a time to allow it to slowly incorporate. If the mixture turns out soupy after a couple of minutes of beating, put it in the fridge for 15 minutes. After beating again it might curdle, but just keep your hopes high and continue to beat the mixture until it turns into a silky smooth buttercream. Add a few drops of pink food colouring if desired. Best used immediately.


Assembly:
1. If making a small cake, create a template for the cakes on a sheet of paper. Use a compass to draw a circle of 5 and 3/4 inches in diameter and cut the stencil out. Then use a knife to cut out 2 circles from the rectangular cake and cut both circles horizontally in half. If making a larger cake, skip this step.

2. Put a cake layer on a cake board or a baking paper circle. Spread a small amount of strawberry jam on the cake and smooth it out with an ofset spatula.


3. Now dollop a scoop of frosting using an ice cream scoop or a large spoon and smooth the frosting out evenly.


4. Repeat steps 2 and 3 with the other layers until you have a nice staked tower of cake. Apply a thin layer of frosting on the outside of the whole cake to act as a crumb coat. It doesn't have to be too neat, the ruffles will cover it up later. This also keeps the crumbs from mixing into the frosting. Refridgerate the cake for 30 minutes or until firm.


5. Place a petal tip (I used no.104) in a piping bag. Fill the piping bag with the remaining buttercream.


6. Hold the piping bag vertically along the side of the cake with the fat part of the tip facing towards the cake and the thin part facing towards you. Apply pressure and squeeze the bag while piping in a back and forth motion until you reach the top, while making sure that the ruffles stick to the cake. Repeat until the whole cake is covered. If you would like to see how it is being done, check out this helpful video by Sweet and Saucy. She made it look so easy!


7. To finish, pipe ruffles on the top as a border (I would have liked to fully cover the top of the cake, but I had no more frosting left. Instead, I scattered the top with some multi-coloured heart confetti. Sprinkles makes everything look better!

June 26, 2012

Strawberries and Cream Macarons


The title of this post says it all. These macarons are filled with a custard-cream that encases a hidden dollop of the best quality strawberry jam. You might have seen these from my last post on how to make macarons. You might have not. Either way, these delicate treats are certainly delicious when filled with a creamy, vanilla-y thick cream. Just what I need to serve an elegant afternoon tea with the girls. Oh, and some organic tea or hot chocolate to go with it too.


Instead of using strawberry jam, you could use fresh pureed strawberries with a little sugar added to it to give it a fresh strawberry scent that is perfect when paired with the cream in the macarons. I must admit that I am a little disappointed with the colour of my macarons since they were over-baked. It makes them look brown and ugly, hiding the real beauty of the macarons. But putting them in pretty cupcake liners adds a touch of cuteness and probably also hides my mistake, right? Next time when I make another batch of macarons, I will be in the kitchen watching closely at the oven door the whole time. That should solve my problem of over-baking macaron shells.


For the macaron recipe and a tutorial on how to make them, click here.

Vanilla Custard Cream Filling
Adapted from the book, Macarons: Chic and Delicious French Treats

Ingredients:
3 egg yolks (saved from the last batch of macarons)
1/2 cup of sugar
1 tablespoon of cornflour/cornstarch
1 cup of milk
1 vanilla pod/bean or 2 teaspoons of vanilla extract
3 tablespoons of unsalted butter
1/2 cup of thickened cream

Method:
1. Whisk together the egg yolks, sugar and cornflour in a heatproof bowl until combined.


2. Heat the milk with the vanilla in a small saucepan until it just starts to boil.

3. Pour the hot milk over the egg yolk mixture and stir until incorporated.

4. Put the mixture back into the pan and simmer gently over a low heat, stirring constantly until the custard thickens and will coat the back of a spoon. Heat it slowly and gently and remove it from the heat immediately after it is ready. Be careful not to boil it too much otherwise it will curdle.

5. Strain the mixture into a clean bowl and add the butter, stirring until it has melted and incorporated. Cover the bowl with plastic wrap and set aside to cool before refridgerating.

6. Whip the cream until it holds soft peaks and fold it into the custard. Chill before filling the macarons.


When done, the custard/cream should look thick and creamy like the one in the picture above. The colour of the filling depends on the type of sugar you use. My filling is kind of a brown colour because I used brown sugar so if you use white sugar, it should look like whipped cream.

After filling the macarons with the cream and strawberry jam, you should refridgerate them for 30 minutes before serving. Don't store the filled macarons in the fridge otherwise they will go soggy from the custard. Store them separately and fill them before serving.


February 19, 2012

Strawberry Swirl Ice Cream Slice


One word for this dish, DELICIOUS! Flicking through my collection of cookbooks (I only have 3 though), I found a recipe that instantly caught my attention and I wanted to create it straight away. The name is the Strawberry Swirl Ice Cream Slice. Slices of vanilla ice cream with strawberry cream swirled together to create a wonderful combination. Strawberries and cream really go well together. Originally, the recipe had raspberries in it and it required bought vanilla ice cream. But I changed it a little by swapping the main hero of the ice cream, the raspberries for the strawberries as well as making my Easy Peasy Ice Cream recipe that I use most of the time. You can tell by now how much I love this recipe. It is super easy and makes creamy ice cream without the hard effort.

Now, back to the ice cream. Photographing this was quite tricky as the ice cream started to melt (it was a little hot that day) really quickly. I had to put it back in the freezer again to take photos when some of it melted in a puddle. But the melted ice cream actually tasted like a good milkshake though. So make sure you store it in the freezer like any other ice cream and serve it right away. This specific recipe would need to be frozen overnight before serving (its worth the wait) and it is yummy on its own or with fresh strawberries and pouring cream. You can also have as many slices as you want but I suggest 2 slices would be good.

Strawberry Swirl Ice Cream Slice

Ingredients

250g (9oz) strawberries*
1 litre (35 fl oz/4 cups) good-quality vanilla ice cream*
250 ml (9 fl oz/1 cup) thickened cream
Extra strawberries and cream to serve (optional)

Method

1. Line the base and sides of a 1.75 litre loaf tin with plastic wrap or foil.

2. Puree the strawberries in a food processor or blender until smooth. Meanwhile, transfer the ice cream from the freezer to the fridge to allow to soften.

Ruby red strawberries
3. Whisk the cream until soft peaks form and fold the strawberry puree into the cream until combined and pink in colour.

Strawberry cream
4. Pour the mixture into a metal freezer tray and cover it with plastic wrap* before putting it into the freezer to cool. Stir occasionally until thick and remove from the freezer after half frozen and beat well.

5. Spoon blobs of softened vanilla ice cream over the base of the prepared loaf tin. Spoon the strawberry mixture between the ice cream blobs. Then use a sharp knife or skewer to swirl the two mixtures together while being careful to not dig into the plastic or foil. Cover the tin tightly with plastic wrap.

6. Freeze for 2 hours or until half frozen and smooth the top of the ice cream. Freeze overnight until set. Serve straight away as scoops or slices with extra strawberries and cream.

*Notes: You can use more strawberries if you want to give it a stronger flavour and colour or use any other berry like raspberries. You could also make your own homemade ice cream using your favourite recipe for the vanilla ice cream. The plastic wrap prevents the ice cream from having ice crystals in it which can ruin the texture of the ice cream. I'm sure everyone likes creamy but not icy ice cream.


Free Blog Template by June Lily